7 Steps To A Painless Garden Redesign
by Jenny
Gretchen Platt, the wife of American Meadows' co-owner Ethan Platt (and super-mom to four kids under the age of seven), first showed me around her gardens in late September. The reason for my visit was to walk Gretchen through a garden redesign, as she felt that hers was overdue for some serious editing and reshaping. Because we were experiencing an incredibly warm and gentle fall here in Vermont, all of her annuals were still in full bloom and a lot of her late fall perennials were still putting on quite a show.
Jump right to the 7 Steps to a Painless Garden Redesign
Her gardens were comprised of what we lovingly call “orphans” around the office: leftovers, plants that needed a little extra attention to thrive, rescues from various past residences, or give-aways from coworkers and friends who needed to thin their own gardens. Because of the communal nature of the American Meadows plant culture, Gretchen’s gardens were exuberant, colorful, diverse, and - yes - a little crowded.

One of the backyard garden beds, before we got to work with our redesign. Our first goal was to clean things up and identify plants to be kept, moved and given away.
Why So Many Of Us Are Ready For A Garden Redesign
The biggest, and easiest, mistake to make when installing new plants is not giving them enough space to grow. This is an especially easy mistake to make when the plants arrive in the mail, as they have usually been cut back or are dormant and quite small. It’s hard to fathom just how fast and vigorously plants from American Meadows grow once they’ve been planted, but I’ve seen it time and time again: a small length of stalk in a 4” pot turns into a healthy, 5’ high and 4’ across Butterfly Bush in just a few short months.
It’s simple to plan for height, width, color, and bloom time when installing an entire garden all at once, but very few of us have the money, time, or energy to install whole gardens in a single season. More often than not, gardens expand and diversify over several seasons of trading with others, buying on impulse, and making a few well-thought-out purchases to “fill in” problem areas.
Learn how to create a garden design plan for a new-to-you piece of property.
This is a common cycle: we gardeners enjoy the thrill of installing a new garden for a few seasons, selectively filling beds in as we go. And then, around Year 3, we realize that our gardens are beginning to design themselves! If we don't step in and take over the design reins soon, we can expect to be dealing with a veritable jungle around Year 7, with no idea how 5,000 plants and no discernable design ended up in our yards.

In cold areas like New England most redesign chores, including plant moving, are best done in warm weather. Even though it was almost Halloween, the weather forecast looked promising enough to dig in and make some changes.

Due to a very warm fall, Gretchen and Ethan still had plenty of late-season flowers in bloom and no sign of frost. Honeysuckle vine, lilies, goldenrod, and a few zinnias had been sharing their flowers with butterflies all fall.
Gretchen’s backyard garden beds had reached Year 7: they were full and lush, but taller plants shaded out shorter plants, vines had grown impossibly vigorous and were “eating” the unfortunate perennials surrounding them, and, most importantly of all, her gardens weren’t working for her.
Your Garden Redesign, Your Needs
The Platts have three daughters who love to cut colorful annuals for bouquets, but it was getting harder and harder to squeeze these plants in among the perennials that were growing fuller with each season. The two blueberries the family had planted a few years back were thin and sparse, as a lush and full pre-planned garden had grown to maturity and totally shaded both plants out. An echinacea was short and stunted, competing for space with a taller lavender hyssop. It was time for a redesign.
Gretchen and I scheduled a second visit in late October, a little later in the season than I would have liked - but hey, life happens (especially with four kids and three busy adults in the equation). This gave me time to roughly sketch out plans and consider problem areas (using the pictures I had taken during my first visit). Thank goodness for the unseasonably mild fall weather, as her annuals were still blooming when I arrived on October 28th and not a single plant had been damaged by frost.
After taking even more “before” pictures to help both of us remember what her gardens looked like and how the heights of various plants “played” together, we went to work cutting back each perennial and pulling out all of the annuals. The Platt girls put up a bit of a fight (“Hey! What are you doing to our flowers!?!”) but quickly understood that sometimes, you have to break an egg to make an omelet.

Believe it or not, a messy, overgrown bed is often a sure sign of an experienced gardener! After several years of 'greening your thumb,' you're likely to look around and notice that you're in desperate need of some editing.

Now is the time to decide what goes where. Although your plants may be healthy, everything will really start working well together after you've righted any garden wrongs, like siting shorter plants back in front of taller ones.
A Good Garden Redesign Starts With A Merciless Clean Up
Once every bed had been cut back and blown out with a leaf blower (to remove the beautiful but obscuring fallen leaves so famous to autumn in Vermont), Gretchen’s gardens suddenly looked markedly more manageable. We could see the crown of each perennial (where the plant emerges from the soil) and were able to pinpoint areas that were simply planted too densely.
Normally, I would advise against transplanting in late October in Vermont, as transplants need to reestablish their root systems before weathering our notoriously long, cold winters, but the weather forecast called for at least two more weeks of weather in the 50s and 60s with no fear of frosts. The plants were healthy and vigorous. Gretchen was itching to get started. We got to work.
We started by filling in some empty spaces in her “Stone Wall Bed” - butterfly weed in a back empty spot for height, a 2’ tall peony in the front to cascade over the lovely stone front of the bed. This emptied out a sunny, easy-to-access “Culinary Bed” right next to their raised vegetable bed, so we popped both of the struggling blueberries out of the “Honeysuckle Bed” and transplanted them to make a kind of “kitchen corner.”

Gretchen helps clean up beds, giving us a much better view of the gardens 'bones', so that we can begin making some decisions. Also - a tarp is one of our favorite garden tools! Easy to drag and bigger than most wheelbarrows, it keeps your grass free of debris which can weigh down and smother blades, causing them to turn yellow.
Choosing Focal Points And Playing Plant Tetris
Once the blueberries had been moved, we spent some time playing what I lovingly refer to as “plant tetris” in the Honeysuckle Bed to ensure that each plant had enough space; taller plants were in the back, bloom time and colors were complementary, and no plants were being shaded out by Gretchen’s extremely vigourous honeysuckle vine. We decided that this gorgeous vine would do most of the “talking” in the bed it was planted in, as it has a long bloom season and is incredibly colorful, aromatic, and dependable. Why mess with a good thing?
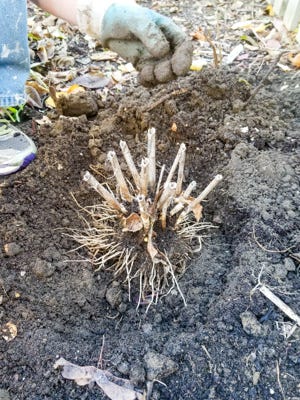
After carefully digging out each problem plant with an edging spade (perfect for this task with its sharp, flat blade) and being sure not to damage the roots in the process, we chose new “homes” for the transplants together, paying extra attention to the spatial and environmental needs of each plant. I dug large holes in each new chosen spot with a shovel, making sure to dig each hole larger than it needed to be to loosen the soil surrounding the transplanted root systems.
Gretchen mixed the family’s own compost into each hole and replanted each new plant carefully. In no time at all, we had moved around 15 plants and mulched most of them with the mulch from an emergency stash the Platts had onsite. Gretchen’s oldest daughter watered each plant well, settling them into their new homes and helping them get ready for winter.

Use an edger to set clean boundaries between grassy lawns and garden beds.
Prune perennials down to the "crown" to see what's happening in your garden.

Perennials need a few weeks in warm soil to re-establish their roots.
Garden Redesign: Making Plans For Future Plants
We intentionally left some empty spaces in each bed for new plants, to be filled in next spring. These will be chosen for color, bloom time, and height and should really “round out” each bed. Keeping the Platt girls’ love of annuals in mind, we left some easily-accessible spots free towards the back of each bed, so the height of zinnias and dahlias wouldn’t shade out shorter perennials toward the front of each bed.
We also discussed installing some ornamental grasses in the “Front Bed,” which frames the Platt home’s front door, and replacing invasive goutweed with a more manageable pachysandra in the “Driveway Bed.” As these are larger-scale projects than the transplanting in the backyard and involve ordering new plants, we agreed to revisit these ideas in the spring.

The honeysuckle garden before we cleaned it up.

And after we pruned, edged and tidied.
7 Steps To A Painless Garden Redesign
- To know what you’re working with, edge/define each bed to confirm the spaces available for plants.
- See the “big picture”: cut back or prune existing plants if necessary, remove leaf debris. Take a step back and notice how plants interact with one another in each bed, and how each bed interacts with the other beds in the space.
- Identify focal plants, reliable plants, and changeable areas. Each garden should have a “hero,” some “meat and potatoes” plants that have long bloom times and stay lush for most of each season, and designated areas for annuals or plants that bloom quickly or less often.
- Find the problem areas, such as: shorter plants in the back, taller plants in the front, plants crowding one another, plants in the wrong area for their needs (sun-loving plants in shade, etc.), or beds missing focal plants, reliable plants, and changeable areas.
- Consider height, size, sun, soil, and water. Research the needs of each problem plant when transplanting. Identify what new home will make each plant, and the plants that surround them, the happiest.
- Make a plan. Draw out your gardens, write lists, make diagrams, or dig up all plants that need to be moved and stage them where you think they would flourish. Only dig plants up if you are able to re-plant all plants within an hour or so, and make sure all plants stay moist between digging up and transplanting.
- Use the “Slow Motion Fireworks” test. A well-designed garden should look like slow motion fireworks, with something “going off,” or blooming, through the entire growing season. A garden will look unbalanced or dull at certain times each season if it doesn’t pass this test, so take the time to pre-redesign to research bloom schedules or take a snapshot of each bed once a week to identify times when your garden isn’t colorful or dramatic enough.
Gretchen and I were able to redesign her backyard beds in three hours or so, while also completing a full fall cleanup and enjoying some quality time with her girls. Like any good gardening project, the plans for her beds are ongoing, and we’re both looking forward to digging in once again next spring. I heard Gretchen say “this is my happy place!” more than once during our redesign, and I, in turn, was reminded of just how lucky I am to be a professional gardener several times that day with the Platts.
Their oldest daughter, smudged with dirt and happily watering her relocated blueberry bushes, showed signs of being bitten by the garden bug as well. We were gardening because we loved it, for the physical and mental challenge, for the anticipation of next season, for the budding (pun intended) friendship between myself and the Platts. If you had asked any one of us that day why we were out there, we would have answered: "Because it makes me happy," pure and simple.
About the Author: Sam Brown is a professional gardener and the owner of Brown Bird Gardens, a landscaping company based out of Charlotte, Vermont. She's also one of the friendly gardening experts who answers the phones in our customer service center, and a wicked good skier.Back to top.