
8 min read
What You Need To Know About Fall Planting
Posted By American Meadows Content Team on Jul 13, 2017 · Revised on Nov 11, 2025
Posted By American Meadows Content Team on Jul 13, 2017 · Revised on Nov 11, 2025
Did you know that fall is a great time to plant? In many parts of the country, fall means cooler temperatures, warm soil, and increased rain. These conditions encourage root growth, and reduce your watering duties, too! Pest pressure decreases, with most having completed their life cycles or begun their dormancy period. Weed pressure also decreases, giving new plants less competition. Last but certainly not least, fall's cooler days invite time spent in the garden. It’s a terrific time to plant!
Getting the timing right is essential for success with fall planting – because gardeners need to know when a killing frost is going to sweep through your area and put an end to the growing season. We're here to help you with expert advice for planting wildflower seeds, perennial plants & woodland wildflowers, and flower bulbs this fall. Read on to learn more!


Planting in fall mimics the natural lifecycle of flower seed heads dispersing ripened seeds at the end of the season. Plus, fall-planted meadows typically bloom 2-3 weeks ahead of spring-planted meadows!
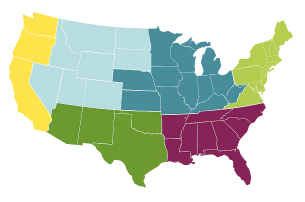
The secret to success is getting the timing right for your climate. When you know your USDA zone and average first frost date, you'll have the information you need to determine if a dormant fall planting or an active fall planting is best.
Find Your USDA Zone Here | Find Your Frost Dates Here
Areas With Freezing Winters | Generally Zones 1-6
Northeast, Midwest, and The Rockies
Temperate Climates | Generally Zones 7-10
Much of the Southeast and Southwest
Areas with No Winter Freeze | Zones 11+
Southern Florida/Texas/California, Southwest
Learn More!
See our guide How To Plant Wildflowers for detailed planting information and more expert tips.
Shop All Wildflower Seeds
As nights lengthen and days begin to cool off in the fall, soil is still quite warm. This provides an ideal environment for plants to encourage root growth. Even while a perennial is dormant, its roots will continue to grow through cool fall months, until the soil is frozen.
By the time next spring warms the soil, your new plants have had plenty of time to establish strong, healthy roots. They'll be ready to start growing as soon as the soil warms and they are ready to wake up from dormancy. (Remember, some plants wake up later in the spring than others.)
Learn More! Visit our Perennial Learning Center for ideas and planting guides on our most popular plants.
Fall is the ideal time to plant woodland wildflowers! Many woodland flowers are the first flowers of spring, and some varieties can be slow to fully mature.
Learn More: See our guide on How To Build A Woodland Wildflower Garden.

Spring's earliest flowers are planted in fall! Fall-planted flower bulbs, including popular Daffodils, Tulips, Alliums, Snowdrops, and more, must be planted in fall to receive adequate time chilling in the ground. This chilling cycle is essential for the bulbs to form flower bulbs.
Learn More! Visit Our Fall-Planted Bulb Learning Center for ideas and planting guides for our most popular bulbs.


